Beveling Leather Designs for Maximum Effect
By Jeff Mosby
One of the questions that I hear most often during a class is “how do I get more depth in my carving?”. While there are several factors that contribute to the amount of depth you can achieve in your leather carving, I believe that good beveling technique is the major factor in achieving the best results.
Before your case or moisten your leather it is very important to back your project with either poster board, x-ray film, plexiglass, packing tape etc. This helps tremendously because it not only keeps your project from distorting and stretching during heavy tooling, it has the added benefit of forcing the leather to be displaced upward instead of outward when it is stamped. Think of it this way: if you put some mud in a basin and you step into it, the mud will rise slightly as you displace the mud with your feet. It can’t go side ways because it is contained within the basin. Backing your project has a similar effect.
Second, the depth of your swivel knife cuts has a great effect on the final depth of your work. If you try to deeply bevel two closely spaced but lightly cut parallel lines (as with a stem) you will notice that the stem area itself wants to flatten out as well. This is because the leather is still connected under the shallow swivel cut. The surface around the line that you are beveling is pulled down with it. If it is cut to the proper depth you will notice that this problem is no longer an issue. (See below)

Assuming that everything is going well, the leather is moist but not too moist, backed with the material you prefer and your swivel cuts are nice and deep then you are ready to start beveling.
I like to use a mix of both traditional and “Sheridan” style bevelers in my carving.
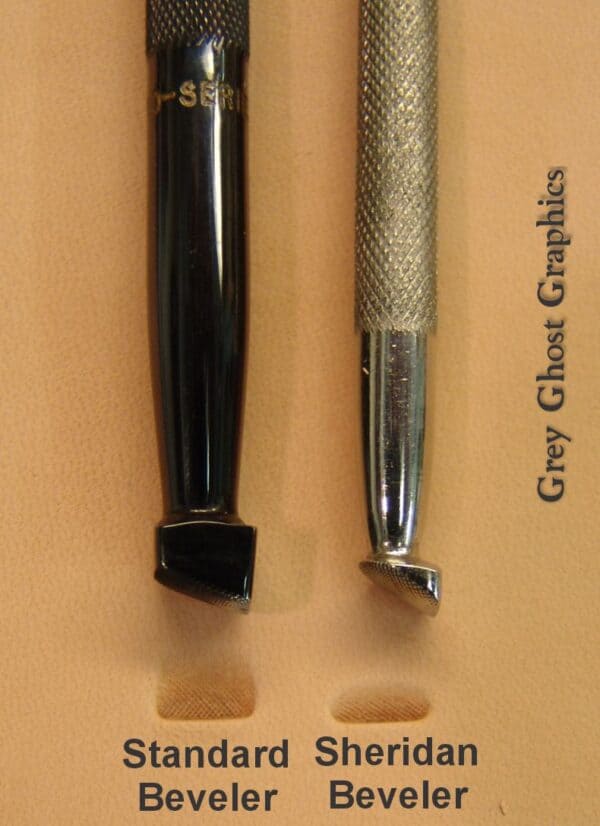
They both have specific uses and inherent strengths and weaknesses. Traditional bevelers have a fairly shallow back angle on the bottom of the tool. This makes them ideal for beveling objects that lie on top of other objects. They have a matting effect in addition to the beveling effect. If you try to use a Sheridan beveler (it has a much steeper back angle to the heel) you will not get the desired matting effect. While you will end up with a beveled line the objects will appear to be on the same level. Sheridan bevelers are lifesavers when beveling in tight areas or where scroll work is extremely tight and close together. That is what they are designed for. (See below)
When you are beveling around a flower for example, the flower usually is resting on top of stems, leaves, acanthus scrolls and the background of the design. To achieve the maximum depth you must create the illusion of depth. If you think about it, the leather is relatively thin so any kind of “real” depth is merely an illusion. Objects must be beveled according to their relative position to other objects in the design.
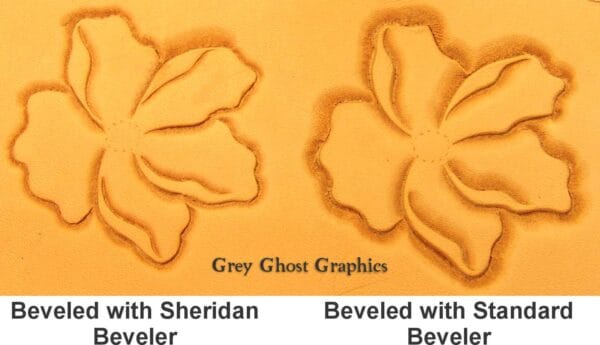
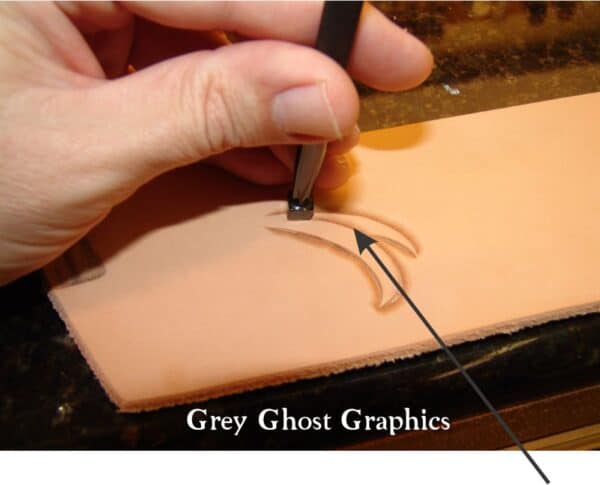
In the example (below left) you can see that the leaf rests on top of several other objects with in turn rest on the background of the design. When I bevel a flower I use moderate force with a standard beveler to achieve the overall appearance that the individual petals are overlapping each other. The matting effect of the beveler helps to accentuate this effect. As I bevel the outside edges of the flower I use full force (I hit fairly hard) when I am beveling over the background area. As I encounter a stem or a leaf I reduce the force substantially. I want to bevel here but I want to show that the distance from the flower to the stem is not as great as it is from the flower to the background. This gives a sense of perspective to the overall design. (below right)
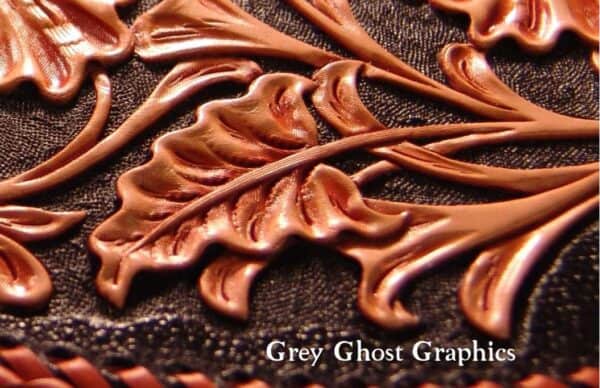
The Sheridan beveler is great when I have to bevel in a tightly spaced area and don’t want to risk mashing down something that may be close by, such as a border or other object in the design. They can also be great for beveling letters, signatures and for getting into tight corners.
(See below)
Choosing the right sized beveler is important as well. Too small and it takes much more time to complete the process and the results are often choppy. For beveling long straight lines or broad curves a large beveler is a good choice. The work goes faster and the results are smoother to the eye. Smaller bevelers are used when the larger beveler simply won’t fit. They tend to require less force to achieve good depth so be sure to adjust the force of your mallet strikes accordingly to avoid going too deep. Because I usually antique my work I like checkered bevelers. They help to hold the antique and enhance the highlighting effect.
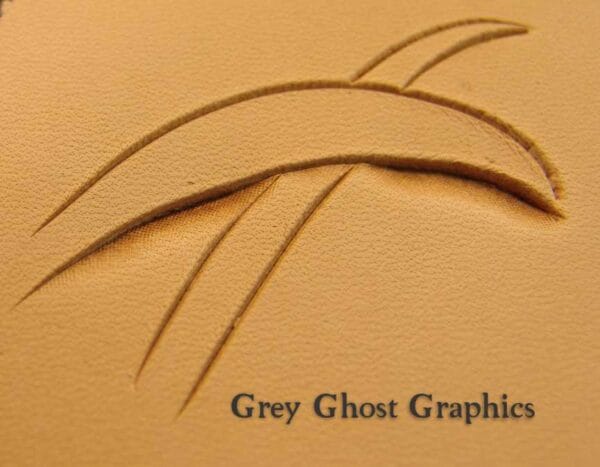
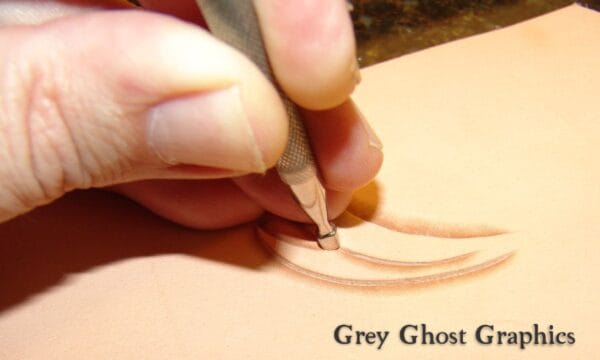
Like most carving techniques, beveling requires a certain finesse that comes with time and patience. You will find that after time, you will discover little tricks that help you to achieve your desired results. Rarely in leather carving will you use a tool “full face” or straight up and down. Often times you will lean the tool (as in camouflage tools, veiners, wigglers etc.) to create a certain effect. Beveling is no different. I often lean the tool towards me as I bevel to avoid excessive matting behind the beveler. When I am beveling towards a stem junction and want the bevel to gradually fade out I lean the tool slightly (see below) to avoid a tool mark at the end of the line.
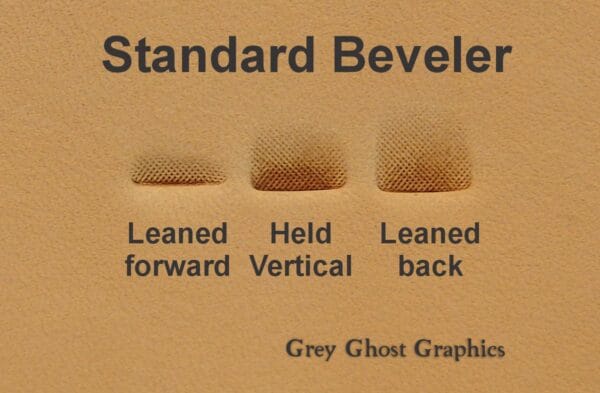
If I want to maximize the matting effect of the beveler I can hold in vertical or lean it slightly away from me to gain the maximum matting effect from the beveler. (See below)
In conclusion, remember that depth in carving is both actual and implied. The actual depth comes from using sufficient striking force to bring the design to sharp relief against the background. The implied depth comes from varying the striking force when beveling over other flowers, leaves or stems to give the “illusion” of greater depth by establishing several layers or levels of depth in your design. By utilizing both techniques you will immediately see a notiecable difference in the depth of your carving